문서 객체 모델은 넓은 의미로 웹 브라우저가 HTML 페이지를 인식하는 방식, 좁은 의미로 document 객체와 관련된 객체의 집합. 이를 사용하면 HTML 페이지에 태그를 추가, 수정, 제거를 할 수 있다.
HTML의 요소는 head, body, h1, div, span 등과 같은 것
자바스크립트에서는 요소를 문서 객체(document object)라 부른다.
HTML 요소 = 문서 객체
DOMContentLoaded 이벤트
- 문서 객체를 조작할 때 사용하는 이벤트
- 오탈자를 주의해 입력
- 웹 브라우저가 문서 객체 모두 읽고 나서 실행하는 이벤트
<head>
    <title>Document</title>
    <script>
        document.addEventListener('DOMContentLoaded',() => {
            const h1 = (text) => `<h1>${text}</h1>`
            document.body.innerHTML += h1('DOMContentLoaded 이벤트 발생')
        })
    </script>
</head>
<body>

</body>

: 코드를 실행하면 <script> 태그가 <body> 태그 이전에 위치해도 문제없이 코드 실행
문서 객체 가져오기
document.head
document.body
document.title
: 해당 요소를 읽음
이외의 다른 요소들은 별도의 메소드를 사용해서 접근
document.querySelector(선택자) : 요소를 하나만 추출
document.querySelectorAll(선택자) : 문서 객체를 여러 개 추출
선택자 부분에 CSS선택자를 입력
| 기본적인 CSS 선택자 | 선택자 형태 | 설명 |
| 태그 선택자 | 태그 | 특정 태그를 가진 요소를 추출 |
| 아이디 선택자 | #아이디 | 특정 id 속성을 가진 요소를 추출 |
| 클래스 선택자 | .클래스 | 특정 class 속성을 가진 요소를 추출 |
| 속성 선택자 | [속성=값] | 특정 속성값을 갖고 있는 요소를 추출 |
| 후손 선택자 | 선택자_A 선택자_B | 선택자_A 아래에 있는 선택자_B를 선택 |
document.querySelector(선택자)
<head>
    <title>Document</title>
    <script>
        document.addEventListener('DOMContentLoaded',() => {
            const header = document.querySelector('h1')

            // style
            header.textContent = 'HEADERS'
            header.style.color = 'white'
            header.style.backgroundColor = 'black'
            header.style.padding = '10px'
        })
    </script>
</head>
<body>
    <h1></h1>
</body>

document.querySelectorAll(선택자)
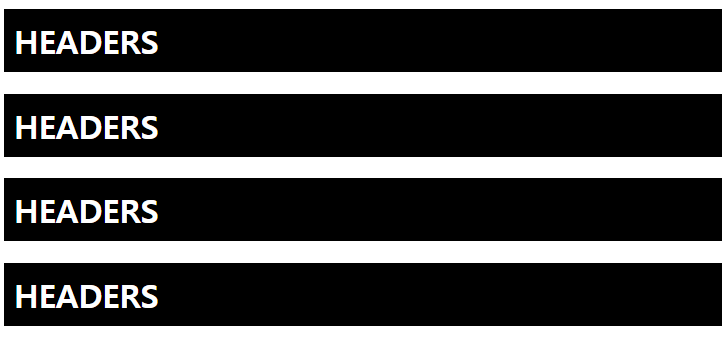
- 문서 객체 여러 개를 배열로 읽어 들이는 함수. 그래서 일반적으로 forEach() 메소드를 사용해 반복 돌림
<head>
    <title>Document</title>
    <script>
        document.addEventListener('DOMContentLoaded',() => {
            const headers = document.querySelectorAll('h1')

            // style
            headers.forEach((header) => {
                header.textContent = 'HEADERS'
                header.style.color = 'white'
                header.style.backgroundColor = 'black'
                header.style.padding = '10px'
            })
        })
    </script>
</head>
<body>
    <h1></h1>
    <h1></h1>
    <h1></h1>
    <h1></h1>
</body>

글자 조작하기
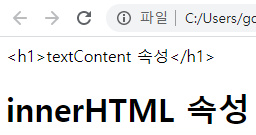
문서 객체.textContent : 입력된 문자열을 그대로 넣기
문서 객체.innerHTML : 입력된 문자열을 HTML 형식으로 넣기
* innerText 속성 : 속성의 성능 문제로 textContent 속성이 추가된 것이므로 글자 조작시 최신의 textContent을 사용
<head>
    <title>Document</title>
    <script>
        document.addEventListener('DOMContentLoaded',() => {
            const a = document.querySelector('#a')
            const b = document.querySelector('#b')

            a.textContent = '<h1>textContent 속성</h1>'
            b.innerHTML = '<h1>innerHTML 속성</h1>'
        })
    </script>
</head>
<body>
    <div id ="a"></div>
    <div id ="b"></div>
</body>

속성 조작하기
문서 객체.setAttribute(속성 이름, 값) : 특정 속성에 값을 지정
문서 객체.getAttribute(속성 이름) : 특정 속성을 추출
http://.com/너비/높이
기본 미션 고양이 이미지들이 출력
<html>
<head>
    <title></title>
    <script>
        document.addEventListener('DOMContentLoaded',() => {
            const rects = document.querySelectorAll('.rect')

            rects.forEach((rect, index) => {
                const width = (index + 1) * 100
                const src = `http://placekitten.com/${width}/250`
                rect.setAttribute('src', src) // or rect.src = src
            })
        })
    </script>
</head>
<body>
    <img class ="rect">
    <img class ="rect">
    <img class ="rect">
    <img class ="rect">
</body>
</html>

'JavaScript' 카테고리의 다른 글
| 09 -1 자바스크립트 클래스 선언, 인스턴스, 생성자 + 실습 (0) | 2021.03.07 |
|---|---|
| 09 -1 자바스크립트 - 객체 지향, 추상화, 객체 처리하는, 생성하는 함수 (0) | 2021.03.06 |
| 05 -1 자바스크립트 함수, 윤년 확인 프로그램 (0) | 2021.02.21 |
| 03 -2 자바스크립트 조건문 switch - case, 삼항 연산자 (0) | 2021.02.17 |
| 04 -1 자바스크립트 배열, push(), splice() 메소드 사용 (0) | 2021.02.14 |


